Installation Instructions
You can view the installation instructions for our products here:
Commdeck
Retrodeck
Commtile Installation Manual
Deckadapter
Strut Clip (L- Type)
Installation Videos
For a quick overview of the Commdeck installation process, please take a moment to view our short installation videos.
Commdeck Installation Video (5 min, 48 sec)
Installing a dish on a Commdeck (1 min, 50 sec)
Wiring Recommendations
- Coaxial Cable – Use RG-6 with Solid Copper Center Conductor
- Ground Wire – #10 Solid Copper
- Typical installation should include four Coax Cables with one ground wire. Homerun all of the wires from the Commdeck to the central power or video distribution point. Leave 6′ of extra cable at each end.
- Refer to the NEC code for proper grounding
Tech Tips
Tech Tip #1: Save Time and Eliminate a Trip onto the Roof Surface
Use a 1/4″ thread or larger toggle wing from a toggle bolt to install the wire into the Commdeck base while working from inside the attic space. In many cases this will eliminate the need to go onto the roof surface to pull cable into base unit. The toggle wing will hold the coax cable and ground wire in place and ready for the satellite dish or antenna installer to use. Toggle wings can be purchased in bulk from your local hardware supply store. View complete instructions with pictures (PDF).
Tech Tip #2: Use Flexible Conduit When You Prewire to the Commdeck
If you are pre-wiring for a system, you may want to home run a Smurf Tube (plastic flexible conduit) from the Commdeck to the central power location or video distribution center. This will allow you to install or change wire as needed for any dish or antenna equipment you may want to use.
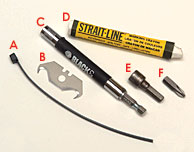
Useful Tools
- Use tie wraps to keep your cable tight to the arm of the satellite.
- Use a hook blade on your utility knife to make cutting the shingles easier.
- Use a drill bit extension to reach top screws underneath shingles.
- Use a white marking crayon for visibility on shingles.
- Use a 5/16” nut driver to place or remove tek screws in lid.
- Use a #2 Phillips drive bit when securing base to roof deck.